
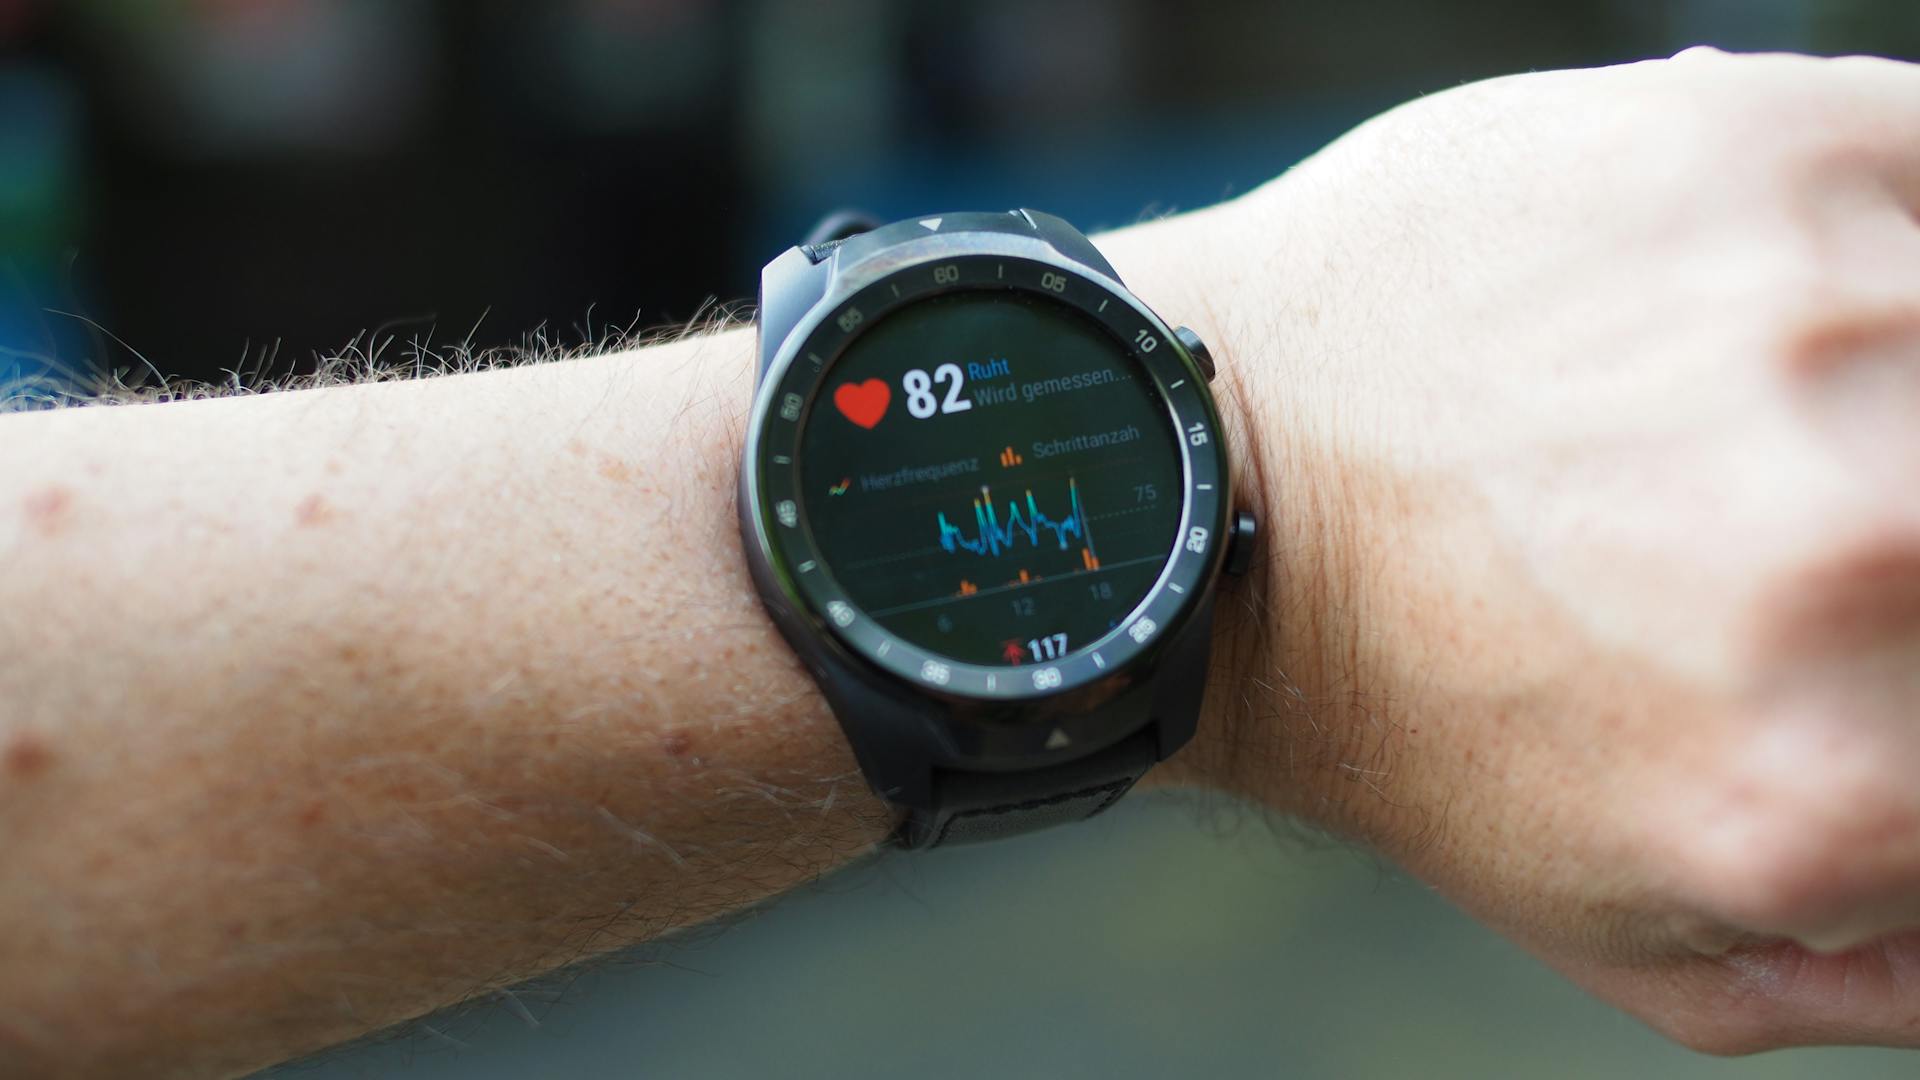
Apple Watch tracks indoor cycling through the built-in Workout app, recording heart rate, active calories, elapsed time, and (with paired Bluetooth accessories) cadence and power. It does not use GPS for indoor sessions, so speed and distance figures on the native app are estimates rather than measured values. That limitation matters less than you might think, because heart rate and power are the metrics that actually tell you whether a session was productive.
TL;DR
- Apple Watch records heart rate, active calories, and time natively for every indoor cycling session.
- Speed and distance are estimated indoors, not GPS-measured, so treat those numbers as rough guides.
- Pair a Bluetooth cadence sensor, speed sensor, or smart trainer (Wahoo KICKR, for example) to get cadence and power data directly on your wrist.
- Enable motion calibration and auto-pause in Workout settings to keep your data as clean as possible.
- The heart rate zones built into the Workout app are a practical guide for managing effort across a ride.
What Apple Watch Measures During an Indoor Ride
The native Workout app captures four metrics without any extra equipment: heart rate, active calories, total calories, and elapsed time. Active calories are the energy your body burns specifically because of the exercise, above what you’d burn resting. Total calories add your resting metabolic rate on top. Both are estimates, and I wouldn’t treat either number as gospel, but they’re consistent enough to track trends week over week.
Speed and distance show up in the app for indoor cycling, but they are derived from wrist motion and algorithm estimates rather than GPS. On a stationary trainer the distance figure is meaningless unless you have a speed sensor attached. Cadence and power don’t appear at all unless you connect an external Bluetooth accessory. That’s the ceiling for native tracking, and it’s worth knowing upfront so you don’t assume you’re getting data you’re not.
Add a Bluetooth cadence sensor or a smart trainer, though, and the picture changes considerably. Cadence (revolutions per minute) feeds directly into the Workout app and appears on your watch face during the ride. Power (watts) does the same when you use a compatible power meter or KICKR-style trainer. At that point you’re working with the same metrics a coaching platform like TrainerRoad uses, just displayed on your wrist.
How the Optical Sensor Actually Works
The photoplethysmography (PPG) sensor is the array of green LEDs and photodetectors on the back of the watch. The LEDs emit light that penetrates the skin and reflects off blood vessels beneath. As blood pulses through those vessels with each heartbeat, the amount of reflected light changes. The watch’s photodetectors pick up those fluctuations and the on-device algorithms convert them into a beats-per-minute reading.
Apple has built cycling-specific algorithms into watchOS that use accelerometer and gyroscope data alongside the optical readings. This matters because wrist motion during cycling is different from running, and the early Apple Watch heart rate readings on bikes were notoriously noisy. The current implementation is considerably better, though you’ll still see occasional spikes if the watch shifts on your wrist mid-ride. A snug fit helps, and wearing the watch slightly higher on your wrist (closer to the forearm) can improve contact.
Calorie calculations layer in your personal data from the Health app: age, weight, height, and biological sex. The watch combines those with your real-time heart rate to estimate energy expenditure using metabolic equations. The accuracy is reasonable for tracking relative effort, but if you’re counting calories precisely for nutrition purposes, a chest strap paired with a dedicated cycling computer will give you a tighter number.
Heart Rate Zones for Indoor Cycling
The Workout app uses five heart rate zones based on a percentage of your maximum heart rate. Apple estimates your max heart rate using the standard formula of 220 minus your age, though you can override this in the Health app if you have a more accurate figure from a fitness test.
| Zone | % of Max HR | What it feels like | Training purpose |
|---|---|---|---|
| Zone 1 | Below 50% | Barely working | Warm-up, cool-down, active recovery |
| Zone 2 | 50-70% | Conversational pace | Aerobic base, fat metabolism, endurance |
| Zone 3 | 70-85% | Breathing hard, still sustainable | Aerobic fitness, cardiovascular conditioning |
| Zone 4 | 85-95% | Hard, short sentences only | Anaerobic threshold, power development |
| Zone 5 | Above 95% | Near maximum effort | Sprint intervals, peak power |
For most indoor cycling sessions I spend the bulk of the ride in Zone 2 or 3, with short Zone 4 blocks when I’m doing interval work. Zone 5 is genuinely hard to sustain for more than 30 to 60 seconds, and if your watch is showing Zone 5 for the whole ride, either the session is extremely intense or the heart rate reading has gone off the rails. Worth checking the fit of the watch if you see that.
How to Set Up Apple Watch for Indoor Cycling
Starting a tracked session takes about ten seconds once you know where everything is.
- Open the Workout app on your Apple Watch. It’s the green icon with a running figure.
- Scroll down to “Indoor Cycle” and tap it. Don’t select Outdoor Cycle by mistake, as that attempts GPS tracking and will affect how your metrics are recorded.
- Set a goal if you want one. You can target a calorie burn, a distance, or a time, or just tap “Open Goal” to start without a target. I usually go open goal for long steady rides and set a calorie target for interval sessions.
- Tap the start button (or wait for the three-second countdown to expire) and start pedalling.
- Swipe left or right on the watch face during the ride to cycle through your metrics screens. Heart rate, calories, and elapsed time each get their own page.
- End the session by pressing the side button and digital crown simultaneously, then tap End Workout. Data syncs to the Fitness app on your iPhone automatically.
Activity Rings update as soon as the workout ends. The Exercise ring fills based on minutes spent in heart rate zones above the moderate threshold, so a solid indoor ride usually closes that ring in one session, which is motivating in a slightly embarrassing way. If you want to understand what you should actually be targeting during sessions, the breakdown of heart rate zones for indoor cycling goes deeper into how to structure your training around them.
Connecting Bluetooth Accessories and External Sensors
Apple Watch pairs Bluetooth cycling sensors through the Settings app on the watch itself, not through the iPhone. The process is straightforward and the sensor stays paired after the initial setup, reconnecting automatically when you start a cycling workout.
According to Apple Support , here’s how to connect a speed sensor, cadence sensor, power meter, or compatible trainer:
- Open the Settings app on your Apple Watch.
- Tap Bluetooth, then scroll down to the Health Devices section.
- Tap the sensor you want to connect. If it doesn’t appear, make sure the sensor is active (most wake up when you spin the crank or wheel).
- Follow the prompts to complete pairing. For sensors with configurable options (wheel size, crank length), tap the info button next to the device to adjust those values.
Once paired, the sensor connects automatically every time you start a cycling workout. You don’t need to open Bluetooth settings again unless you’re adding a new device or troubleshooting a connection drop.
Three accessories worth knowing about for indoor cycling:
- Wahoo RPM Cadence Sensor: Attaches to your crank arm or shoe and transmits cadence over Bluetooth. Around $40 to $50, works reliably with Apple Watch without needing an intermediary app.
- Wahoo RPM Speed Sensor: Fits the wheel hub and estimates speed from wheel rotation. More useful on a non-smart trainer where the app can’t read speed directly from the trainer itself.
- Wahoo KICKR series: These are smart trainers that broadcast power, cadence, and speed over Bluetooth simultaneously. Apple Watch picks them up as a single health device. If you’re on a KICKR, you don’t need separate sensors.
One thing to be clear about: Apple Watch does not support ANT+. If you have older cycling sensors that use ANT+ only, they won’t connect. You need Bluetooth-capable sensors. Most sensors sold in the past few years support both protocols, but check before buying.
Optimising Accuracy: Calibration and Auto-Pause
Two settings inside the Workout app make a noticeable difference to data quality for indoor cycling, and both are off by default on some watch models.
Motion calibration lets the Apple Watch learn your movement patterns over time and refine its calorie and distance estimates accordingly. To enable it, go to the Watch app on your iPhone, tap Privacy, then Motion & Fitness, and make sure Fitness Tracking is on. The watch calibrates passively as you use it, so you don’t need to run a specific calibration routine. Accuracy improves after several sessions.
Auto-pause stops the workout timer when you stop moving. For indoor cycling this mainly applies to situations where you hop off the bike mid-session to adjust something or grab a drink. Without auto-pause, those minutes count toward your workout time and slightly deflate your calories-per-minute figure. To turn it on: open the Watch app on your iPhone, go to Workout, and toggle Auto-Pause to on.
Neither of these settings is a big deal, but they’re low-effort and worth doing. Calibration helps with calorie accuracy over the long term; auto-pause keeps your session data clean if you’re the type who takes water breaks.
Troubleshooting Common Problems
Bluetooth sensor won’t connect or keeps dropping
First, check that your watchOS is up to date. Bluetooth pairing issues between watch and sensor are often resolved in watchOS maintenance releases. Next, confirm the sensor firmware is current if the manufacturer provides updates through a companion app (Wahoo’s app, for example, handles this).
If the sensor simply won’t appear in the Bluetooth health devices list, the most reliable fix is to restart both the Apple Watch and the sensor, then try pairing again. Some sensors go into a deep sleep mode after inactivity and need a spin of the crank or wheel to wake up before the watch can see them.
Metrics on screen look wrong during a ride
Incorrect data mid-ride usually traces to one of two things: a loose watch fit causing a bad optical sensor reading, or a sensor pairing that dropped and silently reconnected to a different data source. Check your watch is snug and positioned slightly further up the wrist than you’d wear it normally. If cadence or power readings are missing or erratic, check the Bluetooth status on the watch during the ride by swiping up to the Control Centre.
For persistent data display problems, go into the Workout app settings and confirm the data fields you’ve selected are pulling from the right source. If you have both a speed sensor and a smart trainer connected, the watch may be trying to use both and getting confused.
Calorie counts seem way off
High calorie estimates usually mean the heart rate reading spiked during the session. Optical sensors can misread if the watch slides around, if you sweat heavily early in the ride before the sensor has stabilised, or if radio frequency interference (from a smart trainer motor, for instance) disrupts the reading. Check the heart rate graph in the Fitness app after your ride. A realistic indoor cycling heart rate should follow a curve rather than jumping between 60 and 180 at random.
Low calorie estimates suggest the opposite: heart rate data that was lower than your actual effort. This can happen if the watch was too loose or if you have an unusually low resting heart rate that the algorithm isn’t accounting for correctly. Adding your actual max heart rate to the Health app (rather than letting the watch calculate it from age alone) helps the zone calculations and calorie estimates become more accurate over time.
A chest-strap heart rate monitor connected to a third-party app like Zones for Training is the cleanest fix if optical sensor accuracy genuinely bothers you. The chest strap signal is more stable than optical wrist-based reading, especially at high intensities. For a broader look at what to pair with Apple Watch on the bike, the guide to indoor cycling accessories covers the options worth considering.
Frequently Asked Questions
Does Apple Watch track indoor cycling automatically?
No. Apple Watch can detect workouts automatically through a feature called Workout Detection, which prompts you to start a workout session if it senses elevated heart rate and movement consistent with exercise. But the prompt requires you to confirm it, and it won’t reliably distinguish indoor cycling from other activities without that confirmation. The correct approach is to open the Workout app yourself, select Indoor Cycle, and start the session manually. That way the data records accurately against the right activity type and syncs correctly to the Fitness app.
Can Apple Watch track cadence without an external sensor?
No. Cadence (pedal revolutions per minute) requires an external Bluetooth sensor or a smart trainer that broadcasts cadence data. The Apple Watch accelerometer cannot reliably detect pedal rotation from wrist movement alone during a stationary indoor cycling session. A Wahoo RPM Cadence Sensor costs around $40 to $50 and solves this completely. Once paired, cadence appears as a data field on your Workout screen and saves to the session record automatically.
How does Apple Watch calculate calories for indoor cycling?
The watch combines your real-time heart rate with your personal data from the Health app (age, weight, height, biological sex) and applies metabolic equations to estimate active calorie burn. The more accurate your heart rate signal is, the closer the calorie estimate will be. If you’ve entered an accurate weight and your maximum heart rate, the estimates are reasonable for tracking trends over time. They’re less reliable for precise nutritional planning. Adding a chest strap or using a connected trainer with a power meter gives the algorithm better input data and tightens the calorie estimate further.
What is the difference between active calories and total calories on Apple Watch?
Active calories are the energy your body burns specifically because of the workout, above your resting metabolic rate. Total calories add your resting metabolic rate (the energy you’d burn just by existing) to the active figure. The Activity Rings use active calories for the Move ring, not total calories. For comparing workout intensity between sessions, active calories is the more useful number. Total calories matters if you’re logging food intake against total daily energy expenditure.
If you want to go further with your Apple Watch data after a ride, including uploading sessions to Strava, syncing with TrainerRoad, or reviewing your health trends over time, the next step is understanding how the data flows out of the Fitness app. I’ve covered that in detail in the guide to Apple Watch indoor cycling data upload.